
The Kitchen Renovation Timeline: What to Expect From Start to Finish
/If you’ve never renovated a kitchen before, it can feel overwhelming before you’ve even made a single decision.
Most people start with excitement.
Then confusion creeps in.
Then anxiety.
And somewhere in the middle of scrolling through kitchen photos at 11 p.m., you start wondering:
Where do we even begin?
How long does this actually take?
What am I supposed to decide first?
And how do I make sure I don’t mess this up?
After 36 years of kitchen renovations, we can tell you this with absolute certainty:
A kitchen renovation doesn’t fail because of one bad choice.
It fails because the process wasn’t understood from the start.
This blog walks you through the entire kitchen renovation timeline, step by step, in the order it actually happens in real life, not the glossy, oversimplified version you often see online.
Think of this as your roadmap.
Not just to a new kitchen, but to a much calmer renovation experience.
Phase 1: The Dreaming Phase (Before You Ever Call a Contractor)
This is where every good kitchen renovation truly begins, even if people don’t realize it at the time.
Before budgets.
Before layouts.
Before contractors.
It starts with inspiration.
Pinterest boards.
Saved Instagram posts.
Magazine photos.
Screenshots from friends’ kitchens.
At this stage, you’re not designing a kitchen.
You’re learning what you’re drawn to.
And here’s something important we tell every client:
👉 Forget whether that kitchen would actually work in your space.
👉 Forget budget for now.
Your only job in this phase is to answer one question:
What do I like about this kitchen?
Is it the colour?
The layout?
The mood?
The simplicity?
The warmth?
The light?
Start noticing patterns.
You’ll often find that your taste is far more consistent than you think.
This phase can take weeks or months, and that’s perfectly normal. There is no rush here.
Phase 2: Defining What You Like vs What You Need
Once you’ve gathered inspiration, the next step is separating aesthetic wants from functional needs.
This is where experience really starts to matter.
A kitchen can look stunning in photos and still be completely wrong for how you live.
This is the phase where we encourage homeowners to ask questions like:
What drives me crazy about my current kitchen?
What works well that I don’t want to lose?
Do we cook daily or occasionally?
Are we entertaining often?
How many people are usually in the kitchen at once?
Is this a forever kitchen or a transitional one?
This is also when you start noticing that some inspiration images contradict each other. That’s normal.
You might love:
A massive island and
A cozy eat-in nook
Open shelving and
Minimal cleaning
A sleek modern look and
Warm, traditional details
None of this is wrong. It just means your kitchen needs to be customized, not copied.
We’ve written an entire blog on how to create a renovation wish list and why it’s one of the most important steps you can take before meeting with a contractor. It helps separate emotional wants from functional needs and leads to much better decisions later on. Check out Creating a Renovation Wishlist: Prioritizing Your Needs and Want
Phase 3: Budget Conversations (And Why They Matter More Than You Think)
For many homeowners, budget is the most uncomfortable part of a kitchen renovation conversation.
People often worry that if they share a number, the contractor will simply design to that number and come back at $39,999 when they said $40,000.
Let us be very clear:
👉 That is not why experienced contractors ask about budget.
We ask because we want to make sure the renovation you’re imagining is realistic, achievable, and aligned with what you’re comfortable spending.
Why We Ask About Budget Early
During initial conversations, clients will often start describing everything they’d like in their new kitchen:
All new cabinets
Quartz countertops
New flooring
Upgraded lighting
Improved layout
Better storage
New appliances
As they talk, we can hear the scope expanding. And when that happens, we’ll often pause and ask:
“Have you given any thought to what kind of budget you’d like to stay within?”
Not to judge.
Not to upsell.
But to ground the conversation in reality.
Because the last thing anyone wants is to experience massive sticker shock when the contractor returns with designs and pricing.
A Real Example (And a Very Common One)
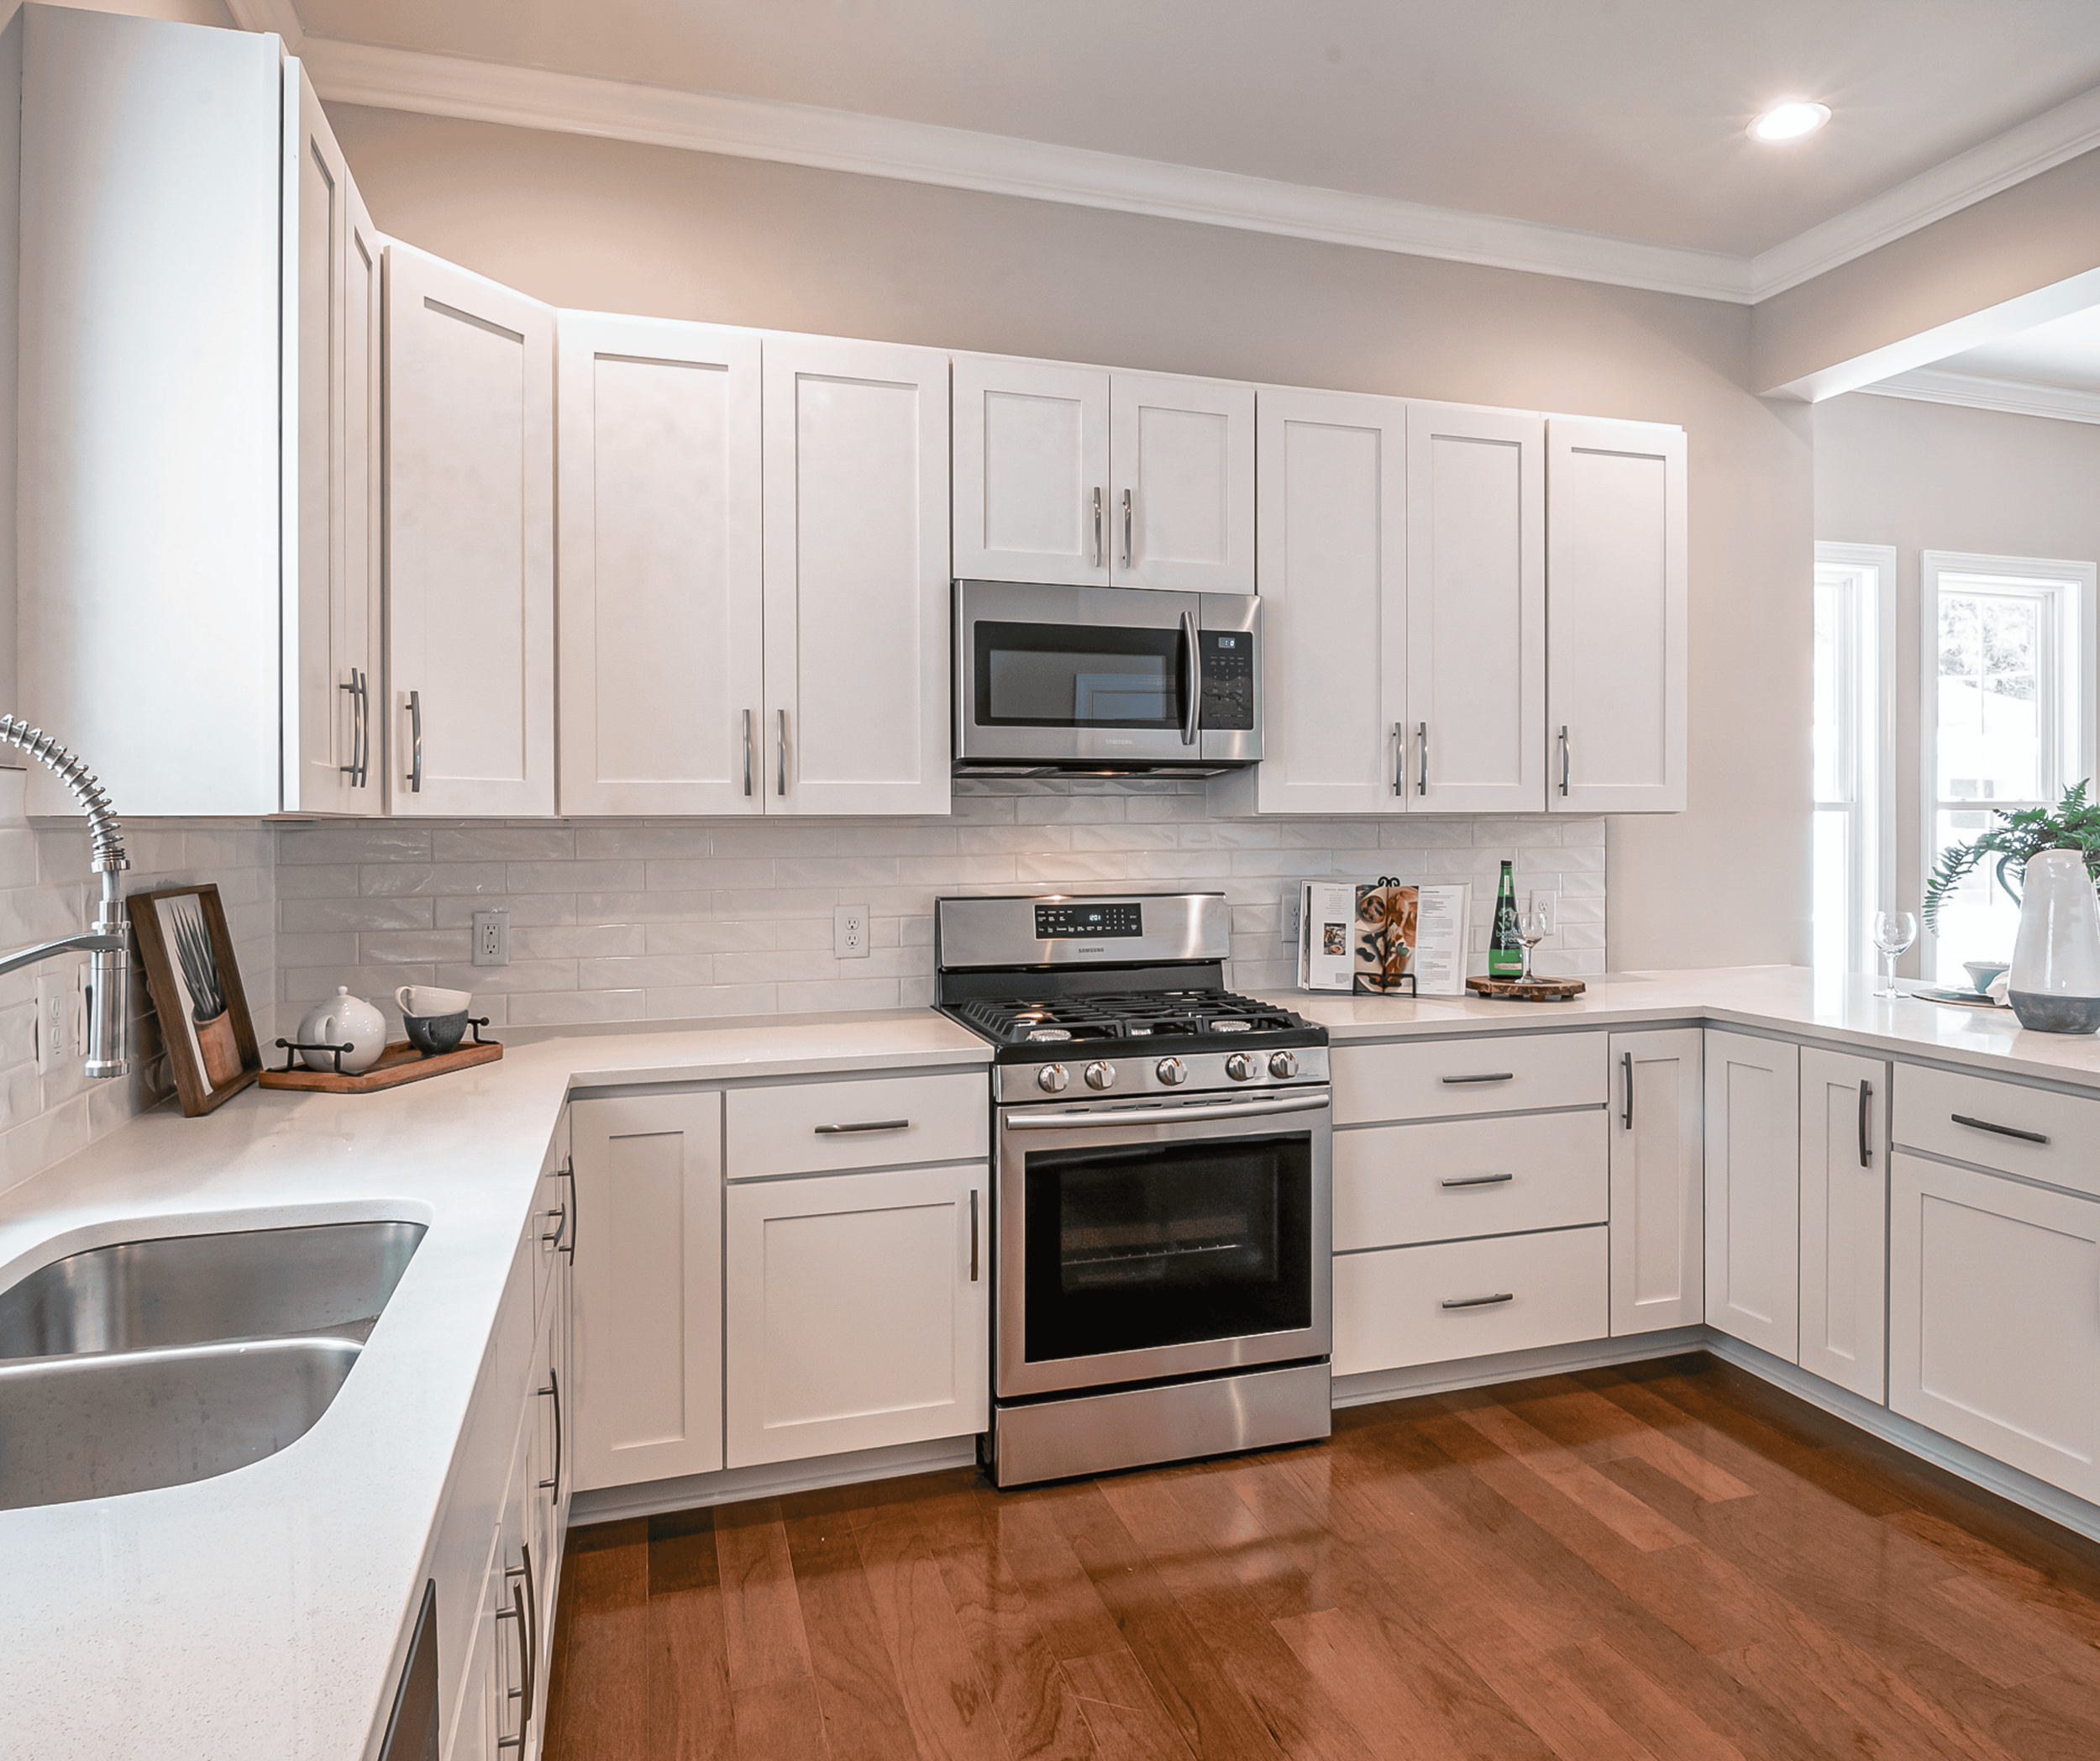
We once had a homeowner contact us about renovating her galley kitchen.
Cabinets on both sides. Straightforward layout.
She wanted:
All new kitchen cabinets
Quartz countertops
New tile flooring
Upgraded lighting
A better overall configuration
When we asked about budget, she said she wasn’t really sure… but added:
“If you come back with something like $20,000, that would be a hard no.”
Here’s the honest reality:
A full kitchen renovation with new cabinets, quartz countertops, tile flooring, lighting upgrades, and layout improvements is not a $15,000 job.
It’s not a $20,000 job.
And it’s not even a $25,000 job, even if you choose the most budget-friendly cabinets available.
That doesn’t mean her expectations were unreasonable.
It simply meant they weren’t informed yet.
And that’s exactly why these conversations matter.
Budget Isn’t About “Gotcha” Pricing
When a contractor asks about budget, it’s not because we’re trying to back into a number.
It’s because:
If you’re envisioning a $60,000 kitchen
And your comfort zone is $30,000
…then no one benefits from going down the wrong path.
If we understand your budget early, we can:
Adjust scope intelligently
Recommend materials that make sense
Offer options you may not have considered
Help you prioritize what matters most
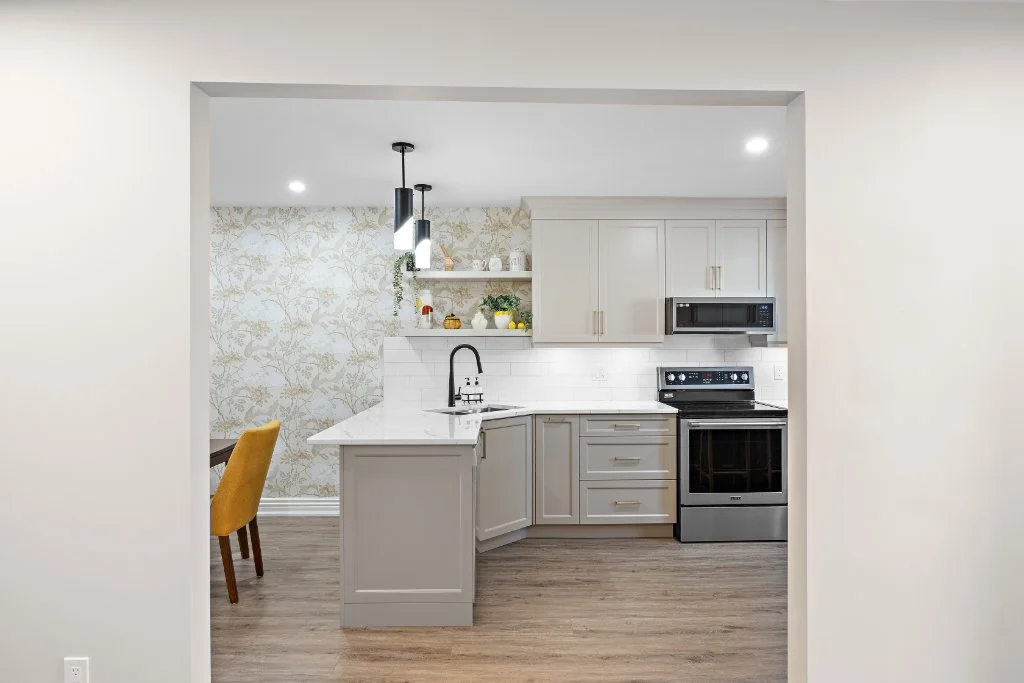
Another Real Example (When Budget Clarity Works Beautifully)
We had another client who told us upfront:
“I’m planning to move in about two years. I don’t want to overspend on the kitchen because I also want to renovate a bathroom.”
That clarity changed everything.
We talked to her about polymer cabinets, which are far more budget-friendly than many people realize, still look fantastic, and come with a 15-year warranty.
I even showed her photos of my own kitchen, because that’s exactly what I had in my home at the time.
She loved them.
Instead of quartz, she chose a laminate countertop that suited:
Her budget
The area she lived in
The fact that it was a townhouse
Her shorter ownership timeline
The result?
She was able to renovate both her kitchen and her bathroom within the budget she had in mind, and she was thrilled with the outcome.
That’s what happens when budget and scope are aligned early.
If You Truly Don’t Know What a Kitchen “Should” Cost
That’s okay. Many people don’t.
If you genuinely have no idea what kind of budget your kitchen renovation requires, an experienced contractor can usually say something like:
“Based on what you’re describing, I’d expect this to land somewhere in this range…”
It will be a wide range early on, because details matter, but it gives you a starting point.
That information helps you decide:
Whether now is the right time
Whether scope needs to be adjusted
Whether expectations need recalibrating
Budget Is About Trade-Offs, Not Sacrifice
Here’s something we tell clients all the time:
If quartz countertops are an absolute must for you, and you genuinely cannot stand laminate, then the budget has to accommodate that — which may mean making compromises elsewhere.
That might look like:
Keeping the existing kitchen layout instead of relocating plumbing
Choosing a different cabinet construction
Simplifying finishes
Phasing the renovation
There is rarely one “right” answer. There are simply better-informed decisions.
Why We Always Recommend a Contingency
Budgets should never be designed to the absolute maximum.
We strongly recommend:
10–15% contingency for most renovations
Up to 20% contingency for kitchens
Kitchens involve:
Plumbing
Electrical
Structural considerations
Older homes with unknowns
A contingency isn’t pessimistic.
It’s smart planning.
Budgets Should Be Fluid, Not Rigid
One of the healthiest mindsets you can have going into a kitchen renovation is understanding that budgets evolve.
You may:
Spend more in one area and less in another
Decide something is worth upgrading once you see it in context
Realize another feature isn’t as important as you thought
Flexibility leads to better outcomes and far less stress.
What If the Kitchen You Want Truly Doesn’t Fit the Budget You Have?
This happens more often than people realize — and it doesn’t mean the project is dead.
There are options:
Adjusting scope
Keeping the existing layout and doing a cosmetic refresh
Phasing the renovation
Exploring different ways to finance the project
We’ve written an entire blog outlining seven different ways to pay for your renovation project, because sometimes the solution isn’t changing the kitchen — it’s changing how the renovation is funded. Read 7 Ways to Pay for Your Renovation Without Going Bankrupt
The Bottom Line on Budget
Talking about budget early isn’t about limiting you.
It’s about:
Protecting your time
Avoiding disappointment
Making smarter design choices
Creating a renovation plan that actually works
When budget, scope, and expectations are aligned, the entire kitchen renovation process becomes calmer, clearer, and far more enjoyable.
And that’s exactly what we want for our clients.

Phase 4: When to Contact a Contractor (Earlier Than Most People Do)
This is where we see people wait too long.
Many homeowners think they need:
Final layouts
Cabinet selections
Appliance choices
Tile picked
Colours chosen
Before calling a contractor.
In reality, the best time to contact a contractor is once you:
Know you want to renovate
Have inspiration images
Have a general sense of priorities
Are open to guidance
A good contractor doesn’t just build.
They help you shape the project.
This is where experience saves time, money, and frustration.
If you’re thinking about renovating your kitchen and want to understand the process before making any big decisions, we’re always happy to talk things through. Sometimes a clear conversation early on makes all the difference.
Phase 5: The Initial Consultation (Laying the Foundation)
The first meeting is not about selling. It’s about listening.
We want to understand:
How you use your kitchen
What isn’t working
What matters most to you
Your comfort level with disruption
Your timeline expectations
Your decision-making style
This conversation sets the tone for everything that follows.
A strong consultation should leave you feeling:
Heard
Understood
Informed
Calmer than when you started
If it doesn’t, that’s important to pay attention to.
Phase 6: Design Development and Layout Decisions
This is where ideas start turning into real plans.
Layouts are refined.
Traffic flow is considered.
Work zones are evaluated.
Clearances are checked.
This phase often includes:
Reviewing multiple layout options
Discussing what changes are structural vs cosmetic
Understanding how design choices impact cost
Adjusting based on real-life constraints
This is also where compromise happens, and that’s okay.
Good design isn’t about getting everything you want.
It’s about getting what matters most right.
Phase 7: Detailed Scope and Quoting
Once the design direction is clear, the scope of work is defined in detail.
This includes:
Demolition
Framing
Electrical
Plumbing
Cabinetry
Flooring
Tile
Painting
Finishing details
A good quote should be:
Clear
Detailed
Transparent
Easy to understand
You should know what’s included, what isn’t, and how changes are handled.
This clarity prevents stress later.
Phase 8: Selections and Ordering
(Where Good Guidance Makes All the Difference)
Once a contract is signed and a deposit is in place, many homeowners think the hard part is over.
In reality, this is where some of the most important decisions of the entire renovation happen — and where having an experienced guide matters more than ever.
This phase is all about making selections in the right order, so everything works together visually, functionally, and financially.
And just as importantly, it’s about not having to do it alone.
Step One: The Cabinet Showroom (This Is Where Everything Starts)
The very first thing we schedule after contract signing is a meeting at our cabinet maker’s showroom, and there’s a reason for that.
Cabinets are the single biggest visual element in your kitchen.
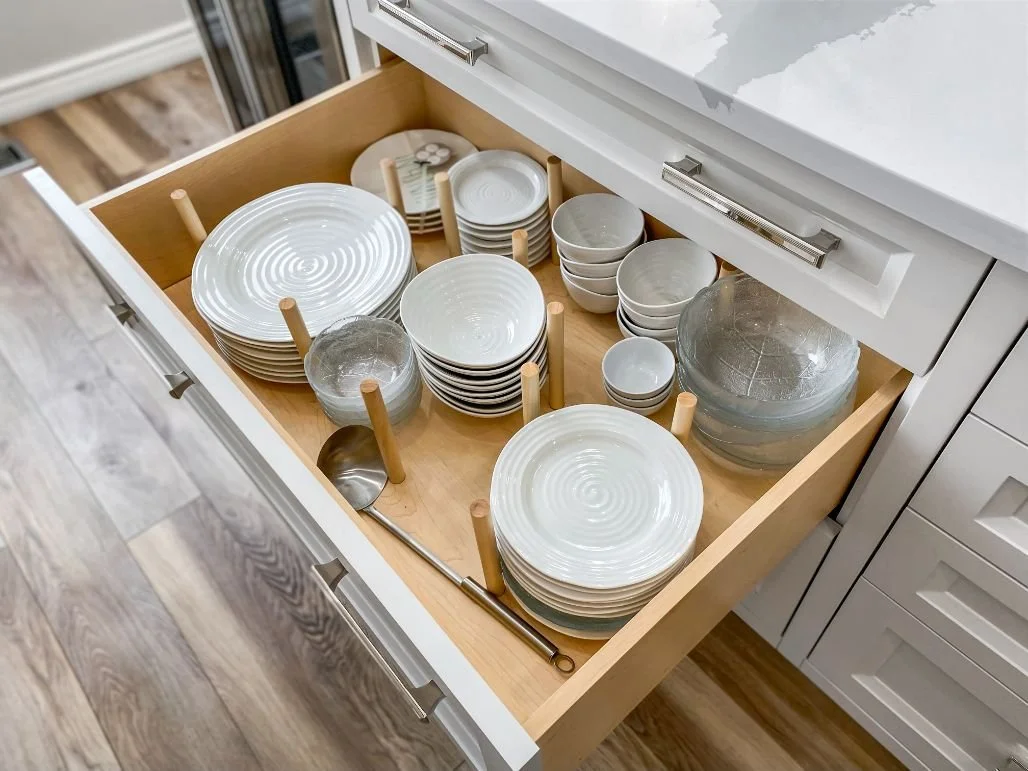
They:
Take up the most wall space
Set the overall tone of the room
Influence every other finish that follows
At the showroom, you’ll be able to:
See different cabinet door styles in person
Compare colours and finishes under proper lighting
Understand construction differences
Explore how certain doors feel more modern, traditional, or transitional
This is not a rushed appointment. We often spend 2-3 hours with our clients at the showroom.
This is a guided, thoughtful process.
Coordinating Cabinet Doors, Colour, and Hardware Together
While we’re at the cabinet showroom, we don’t just look at door styles in isolation.
This is also the ideal time to:
Coordinate cabinet hardware
Look at how different pulls and knobs work with specific door profiles
Decide whether hardware should blend in or stand out
Seeing the cabinet door, colour, and hardware together makes decision-making much easier and far less overwhelming.
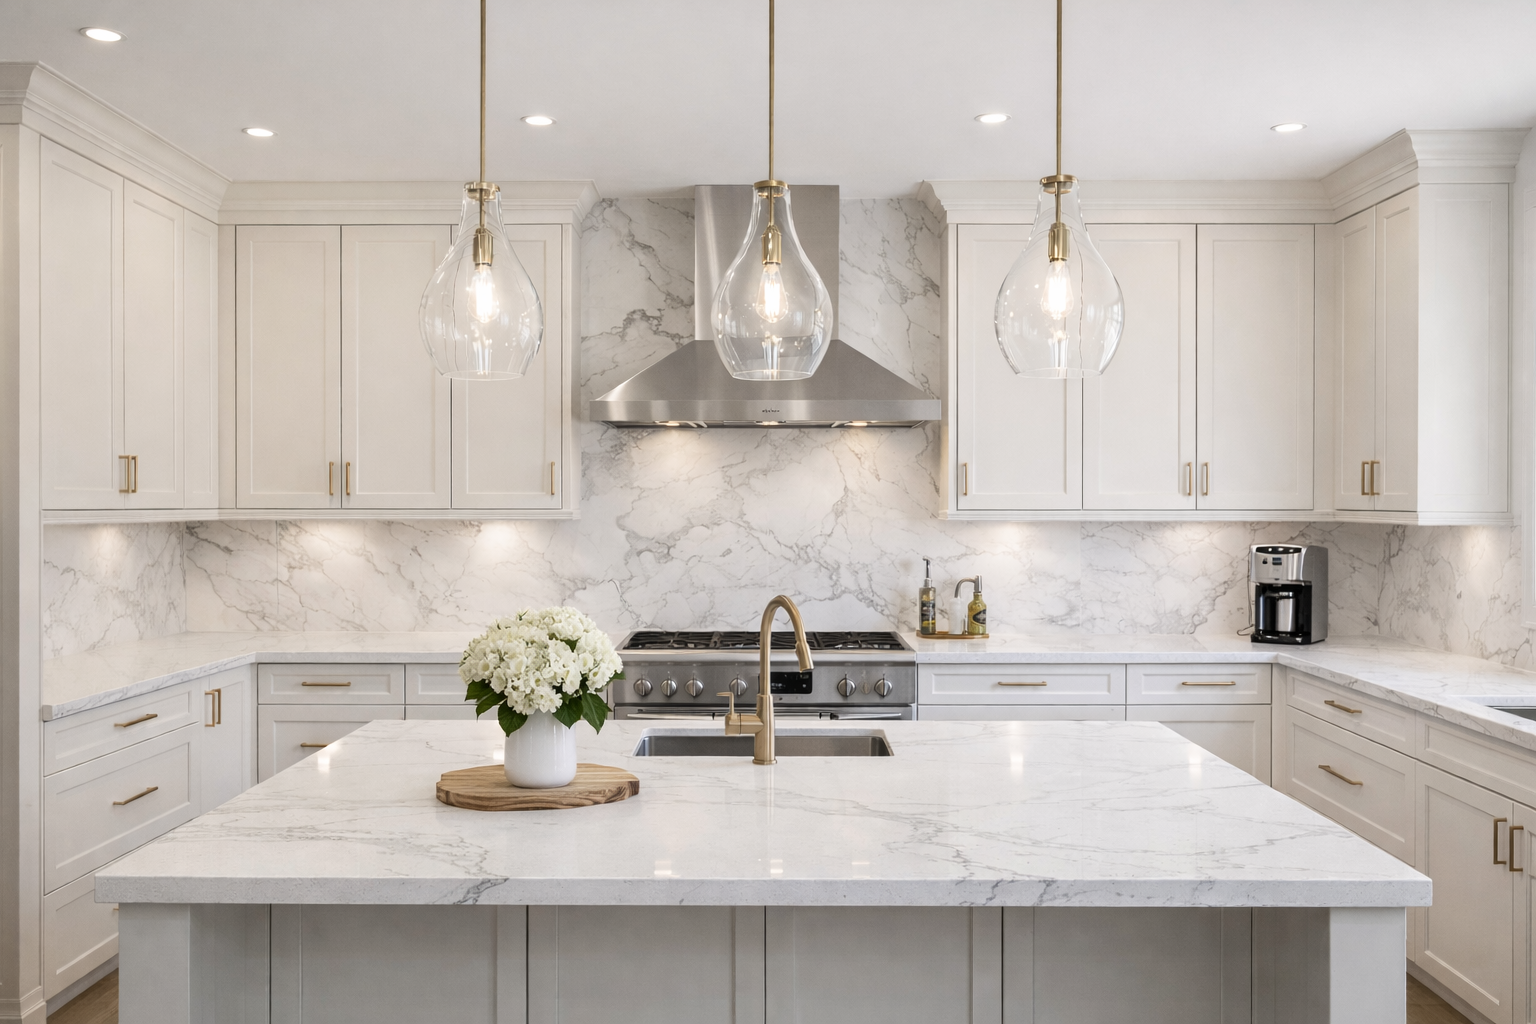
Selecting the Countertop at the Same Time (Highly Recommended)
Once you’ve chosen your cabinet door style and cabinet colour, it’s the perfect moment to start looking at countertop options.
Why?
Because countertops don’t exist on their own. They sit directly against your cabinets.
Looking at:
Cabinet colour
Door profile
Hardware
Countertop samples
together allows you to see how everything works as a whole, instead of guessing piece by piece.
This is where many homeowners have big “aha” moments.
Physical Samples Matter (We Always Provide Them)
Once cabinet colours and countertops are selected, we make sure you have real samples in your hands.
That includes:
A physical sample of the countertop you’ve chosen
A large paint chip (typically around 8" x 10") of your cabinet colour
If a wall colour has already been discussed, we can include that as well, but it’s important to know:
👉 Wall colour is not a priority at this stage.
It comes much later, and for good reason.
Flooring Comes Next (Especially If It Extends Beyond the Kitchen)
At this point, we’ll meet with you at the flooring supplier, and you’ll bring:
Your cabinet colour sample
Your countertop sample
This step is critical.
It doesn’t do any good to fall in love with a flooring option that clashes with your cabinet colour or works against the tone of your countertop.
By looking at everything together, we ensure:
Colours complement each other
Undertones work together (not against each other)
The flow between spaces feels intentional
There is a very real order to these decisions, and skipping it often leads to regret later.
Why There Is an Order to All of This
We follow this sequence intentionally:
Cabinets (door style + colour)
Countertop
Flooring
Backsplash tile
Wall paint colour (last)
Cabinets anchor the room.
Countertops support them.
Flooring ties the space together.
Backsplash adds personality.
Paint fine-tunes everything.
Trying to pick these out of order often creates confusion and second-guessing.
Backsplash Tile: Before or After Countertops?
Once cabinets, countertops, and flooring are selected, it’s time to think about backsplash tile.
There are two ways this can be done, and both are perfectly valid.
Option 1: Select the Backsplash Early
Because we provide samples of everything, many clients are comfortable choosing their backsplash before construction begins. This allows:
Everything to be ordered in advance
A smoother construction timeline
Option 2: Wait Until the Countertops Are Installed
Some clients prefer to see their entire countertop installed before committing to a backsplash tile.
This can delay the finishing stage slightly, but many people find it worth it for peace of mind.
Either approach is fine.
What matters is choosing the one that feels right for you.
Wall Paint Colour: The Very Last Decision (Always)
Wall paint colour is intentionally one of the last things we select.
And this surprises a lot of people.
There are thousands of paint colours. If one feels slightly too yellow, too grey, or too blue, it’s easy to adjust.
Paint should support the finishes you’ve already chosen, not dictate them.
That’s why we leave it until:
Cabinets are finalized
Countertops are chosen
Flooring is selected
Backsplash is decided
At that point, finding the right paint colour becomes simple instead of stressful.
We’re With You Every Step of the Way
One of the things our clients tell us they appreciate most is that they’re never left to figure this out on their own.
We:
Meet you at the cabinet showroom
Meet you at the flooring supplier
Go with you to the tile store
Bring samples if you don’t have them with you
Look at everything together
Offer honest feedback and guidance
We don’t dictate your choices.
We help you see how everything works together.
That guidance is what prevents costly mistakes and endless second-guessing.
Why This Phase Matters So Much
This selection phase isn’t just about finishes.
It’s about:
Confidence
Clarity
Reducing overwhelm
Making decisions you won’t regret
When choices are made in the right order, with the right support, the rest of the renovation flows much more smoothly.
And that’s exactly how we want our clients to feel — informed, supported, and excited about what’s coming next.
Phase 9: Pre-Construction Preparation
Before work begins, there’s a lot happening behind the scenes.
Schedules are finalized.
Trades are coordinated.
Materials are confirmed.
Your home is prepared for disruption.
You’ll also need to prepare personally:
Setting up a temporary kitchen
Planning meals
Adjusting routines
Managing expectations
This phase sets the stage for a smoother build.
We’ve written a separate blog with practical, real-life ideas for planning meals during a kitchen renovation, including simple strategies that make this phase far more manageable. Learn more about 6 Ways to Prepare Meals During a Kitchen Renovation
Phase 10: Construction Begins
(What Actually Happens — and Why Timelines Vary)
This is the phase most people picture when they think about a kitchen renovation.
The noise.
The dust.
The visible progress.
And while every kitchen renovation is different, there are some general timelines we can share to help set realistic expectations.
What’s important to understand from the start is this:
👉 Construction timelines are influenced by scope, structure, and surprises behind the walls.
That’s exactly why experience and planning matter so much.
Demolition: Usually 1–2 Days
For most kitchen renovations, demolition is fairly quick.
Removing:
Existing cabinets
Countertops
Flooring
Non-structural walls
…can typically be completed in one to two days, depending on the size of the kitchen and how extensive the demo is.
This phase often feels dramatic, but it’s usually over faster than people expect.
Structural Work: A Completely Different Category
If a kitchen renovation involves removing walls, especially load-bearing walls, timelines change significantly.
Structural work can range from:
A couple of days
To several weeks
depending on:
How many walls are being removed
Whether they’re load-bearing
The size of the spans
Whether engineered beams are required
We’ve completed kitchen renovations where three large structural walls were removed, including the installation of a steel I-beam that had to be craned into the house.
That type of work alone accounted for three to four weeks of construction time before we could even move forward.
This is also why we often say that structural changes deserve an entire conversation of their own — because they impact timelines, budgets, permits, inspections, and sequencing.
Electrical and Plumbing: Usually 1–2 Days
Once demolition and any required structural work are complete, electrical and plumbing rough-ins typically move fairly quickly.
In most kitchens:
Electrical and plumbing can be completed in one to two days
That said, timelines can extend depending on:
How much is being relocated
Whether new circuits are required
Appliance changes
Lighting plans
Relocating a sink, moving appliances, or upgrading electrical capacity adds complexity, which is why these details are discussed early in the planning phase.
Drywall Installation and Repairs: About 3–4 Days
After rough-ins are complete and inspections are passed, drywall work begins.
This usually includes:
Installing new drywall where walls were opened
Patching and repairing existing areas
Taping, mudding, and sanding
Drywall typically takes three to four days, largely because drying time between coats is just as important as the work itself.
Rushing this stage almost always shows later.
Painting: Often 1 Day
Once drywall is finished, painting can usually be completed fairly quickly.
In many cases:
Painting can be done in one day
This is one of the reasons wall colour is selected late in the process — it’s flexible and easy to adjust once all the permanent finishes are in place.
Cabinet Installation: Approximately 1 Week
Cabinet installation is a major milestone and one of the most exciting phases for homeowners.
For an average-sized kitchen:
Cabinet installation typically takes about a full week
Smaller kitchens may be quicker, but we plan conservatively because precision matters here.
Countertop Templating and Fabrication: The Waiting Game
Once cabinets are installed:
The countertop is templated (usually takes about an hour)
Then fabrication begins
This is where patience is required.
Fabrication and installation typically take:
10 days to two weeks, depending on material and supplier timelines
This waiting period is normal and unavoidable.
Flooring: 1 Day to 3 Days (Depending on Scope)
Flooring timelines depend on:
The type of flooring selected
Whether it’s limited to the kitchen or extends throughout the main floor
In many cases:
Flooring can be completed in one day
Whole main-floor installations may take up to three days
Some flooring must be installed before cabinets, others after, depending on material and manufacturer requirements. This sequencing is planned well in advance.
Final Work After Countertops: 3 Days to 1 Week
Once countertops are installed, the project enters the final stretch.
This usually includes:
Installing the sink and faucet
Connecting plumbing
Installing the dishwasher
Tiling the backsplash
Electrical finishes
Final adjustments and touch-ups
This phase can take anywhere from three days to a full week, depending on complexity and finish selections.
Why We Build Buffers Into Timelines
One of the most important things we do during scheduling is build in time buffers.
For example:
If we believe construction will take two weeks, we plan for three
Cabinet installation dates are locked in advance and can’t easily be moved
Sometimes:
Construction only takes a week
Other times it stretches to four, six, or even eight weeks
Especially when structural work is involved.
Buffers aren’t pessimism.
They’re responsible planning.
They protect the schedule, reduce stress, and keep the entire project moving forward even when unexpected issues arise.
What This Means for You as a Homeowner
Understanding this phase helps you:
Set realistic expectations
Feel less anxious when timelines shift slightly
Appreciate why early planning matters
Recognize the value of experience
Every kitchen renovation is unique, but when you know what’s typical, it’s much easier to navigate what’s unexpected.
Phase 11: Final Walkthrough and Living in Your New Kitchen
The final walkthrough isn’t just about checking boxes.
It’s about:
Understanding how everything works
Knowing how to care for your finishes
Feeling confident in your new space
And then comes the best part: actually living in it.
Cooking feels easier.
Storage makes sense.
The space supports your daily life.
That’s when you know the process worked.
Final Thoughts: Why the Timeline Matters So Much
A kitchen renovation is one of the biggest investments you’ll make in your home.
Understanding the timeline:
Reduces anxiety
Prevents rushed decisions
Builds realistic expectations
Leads to better results
When the process is respected, the outcome is almost always better.
And that’s exactly what we aim for on every kitchen renovation we do.
If you’re thinking about renovating your kitchen and want guidance, clarity, and a process that feels manageable from start to finish, that’s where experience truly matters.
Planning a kitchen renovation is about more than choosing finishes. It’s about having a clear process, realistic expectations, and the right team guiding you from start to finish.
If you’re ready to start planning your kitchen renovation and want experienced, honest guidance every step of the way, we’d love to hear from you.

Planning a kitchen renovation involves a lot of decisions, and understanding the process makes all the difference. If you’re still in the planning stage, these additional kitchen blogs dive deeper into specific topics that often come up along the way.