
The 30-Minute Monthly Home Safety Check That Could Save You Thousands
/
You know that sinking feeling when you spot a mysterious stain creeping across your ceiling and immediately picture dollar signs falling from the attic? Or when your lights flicker for no reason, and you wonder if your house is trying to tell you something—or just planning a dramatic exit?
Here’s the truth: most major home disasters didn’t start as disasters. They started as small, sneaky, ignorable issues. The drip under the sink. The loose outlet cover. The patch of cracked grout in the shower. Tiny problems that—left unchecked—turn into big, expensive, soul-draining messes.
Enter the monthly home safety check. It’s fast. It’s free. It’s DIY-friendly. And it just might save you thousands of dollars, your family’s safety, and your sanity.
Let’s walk you through everything you need to check, what it means when something’s wrong, whether you can fix it yourself, and when to call in the pros (like us at Multi-Trade, hint hint).
Why You Should Be Doing This
💸 Save Money:
Finding a problem when it’s $40 to fix is always better than waiting until it’s $4,000. A leaky tap left unchecked doesn’t just waste water—it can ruin cabinetry, flooring, drywall, and spark mould growth faster than you’d expect.
🛑 Keep Your Family Safe:
Loose wiring? Fire hazard. Hidden mould? Breathing hazard. Clogged dryer vent? Carbon monoxide and fire hazard. This is the stuff you really don’t want to discover too late.
🧰 Feel Empowered:
This isn’t about becoming a full-time inspector—it’s about noticing the small things that are waving red flags before they become full-blown emergencies. And yes, you’re absolutely capable of doing this.
What You’ll Need (Don’t Worry—No Toolbox Overload Here)
Flashlight (your phone works in a pinch)
Sticky notes or painter’s tape (to flag issues)
Screwdriver (flathead + Phillips)
Receptacle tester with a GFCI button tester
Your phone camera or a notepad
A step stool (or, yes, the closed toilet lid in a pinch—just hold onto your knees and your pride)
The Monthly Home Safety Checklist
Let’s break this down into manageable zones so you can move through your home with purpose (and maybe a smug sense of adulting pride).
1. Electrical Checks
Let’s start with the one that’s most intimidating for many homeowners: electrical safety. And fair enough—electricity is invisible, powerful, and completely unforgiving. But don’t worry, you’re not rewiring your house here—you’re just doing a quick, smart scan for red flags.
Before you start, grab your receptacle tester. (If you don’t have one, they’re inexpensive, available at any hardware store, and worth their weight in safety. You just plug it in, and it tells you if the outlet is wired properly—magic.)
✅ Test outlets and switches
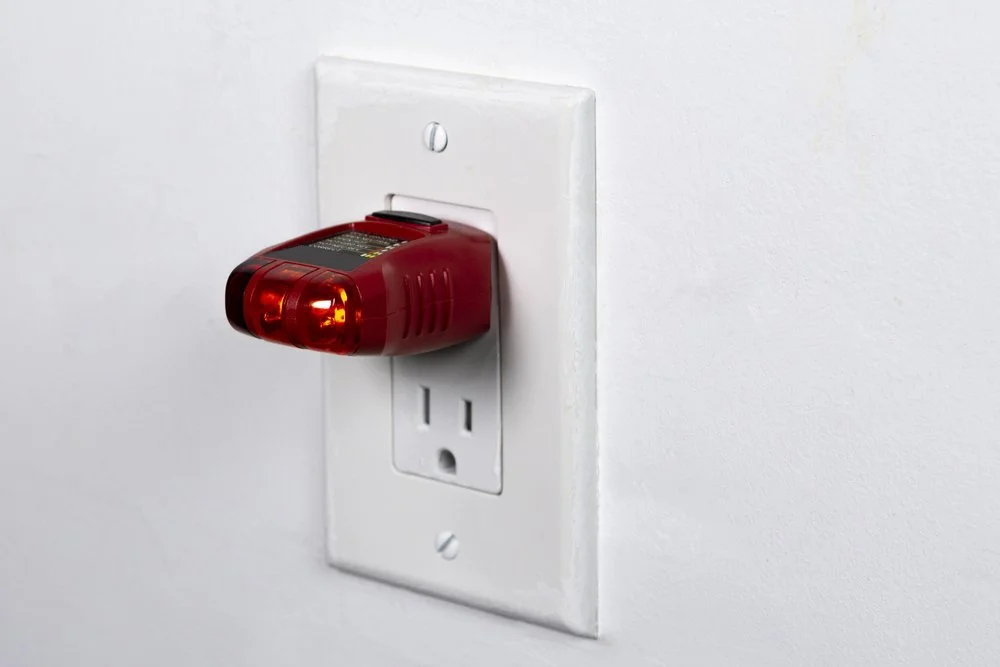
Grab your outlet tester and plug it into each outlet as you do your walkthrough. Most testers have a series of indicator lights—usually three—that light up in different combinations. You’ll want to see the two outer lights come on, which generally means everything’s wired correctly. If only one light appears, or you get a different combo, check the chart printed right on the tester (usually above or below the lights) to decode the issue. It could be something as simple as a reversed wire—or a sign it’s time to call in the pros.
Don’t use outlet extenders or power strips long-term. If you’re using one in every room, you likely need more outlets installed (and we can help with that).
2. Plumbing Check
Plumbing issues are the stealth assassins of your home. They love to hide behind closed vanity doors, under dusty basement pipes, or under tubs until suddenly—you’re mopping your bathroom floor at 3 a.m. and Googling “how much does an emergency plumber cost.”
A simple monthly check can help you catch leaks, drips, or signs of water damage before they become a full-blown flood.
✅ Check under every sink
What to do: Open the cabinet doors beneath all your sinks (kitchen, bathroom, laundry) and shine your flashlight in.
What to look for:
Puddles or dampness around the base of pipes or on the cabinet floor.
Discolouration, bubbling, or peeling in the cabinet surface—this means there’s been water there, even if it’s dry now.
White or green crusty buildup around pipe joints or valves—this is mineral deposit from a slow leak.
Mildew smell? Yep, that’s a hint you’ve got a moisture problem, even if you can’t see it.
What to do next:
Run the water for 10–15 seconds and watch the pipes and the P-trap (the curved part of the pipe) while it drains.
Gently run your fingers around the joints—if they feel wet or if water appears, you've got a leak.
💡 Pro tip: Put a piece of white paper towel or dry cardboard on the cabinet floor and leave it for a few hours. Come back later and check for water spots.
✅ Check around toilets and tubs
What to do: Look at the base of your toilets, where they meet the floor, and the caulking around your tubs and showers.
What to look for:
Water around the toilet base: Could be a failed wax seal—especially if it’s happening after flushes.
Dark or missing caulking: Around tubs, this is an entry point for water, which can lead to rot or mould behind the wall.
Soft flooring or warping near tubs or toilets: Sign of long-term water exposure.
💡 Gross but important: If the caulk around the tub smells musty or your flooring feels spongey, you could already have subfloor damage.
✅ Run the water and watch your drains

What to do: Turn on taps and let them run for 10–15 seconds, then turn them off and watch how quickly water drains.
What to look for:
Slow draining: Could mean buildup, partial clogs, or venting issues.
Gurgling sounds: Often a sign of blocked venting, which can eventually lead to drain backups.
Water backing up into a second sink: Like your kitchen’s double sink or bathroom vanity—this means trouble is brewing.
✅ Check your shut-off valves
What to do: Look at the little round or oval handles under sinks and behind toilets—those are your shut-off valves. Give each one a gentle twist back and forth to make sure they’re not seized.
What to look for:
Corrosion or white/green crust: This means water has been leaking slowly and drying there—often overlooked but can lead to valve failure.
If the valve won’t budge or squeals: It might be on its last legs and should be replaced before you actually need it in an emergency.
💡 Note: Don’t force a valve that won’t turn. Better to flag it now than to snap it and end up with a geyser.
✅ Check ceilings or walls below bathrooms or laundry rooms

What to do: Go to the room beneath the bathroom, laundry room, or kitchen—especially if you have a two-storey home—and scan the ceiling.
What to look for:
Yellow or brown stains
Peeling paint or bubbling drywall
Sagging ceiling texture or a “shadow” that won’t go away
These are signs of a slow leak insidw the floor above. The earlier you catch it, the better—because that’s when it’s still a plumbing job, not a plumbing + drywall + flooring + mould job.
Need a Hand with a Few of Those To-Dos?
If your monthly safety check has turned up a growing list of little fixes—like a leaky faucet, loose railing, or a sticky door—you don’t have to tackle it all on your own. These may be “small jobs,” but they can have a big impact on your home’s safety and peace of mind. We’re happy to help lighten your load and cross a few things off that list.
🔥 Section 3: Fire and Carbon Monoxide Safety
No one likes to think about fire or carbon monoxide danger in their home—but the truth is, this is one of the most preventable safety risks, and also one of the most deadly if ignored. A few quick monthly checks could mean the difference between life and tragedy.
The best part? These checks take minutes, cost almost nothing, and are easy enough to do in your pajamas (no judgment here).
✅ Test all smoke and carbon monoxide detectors
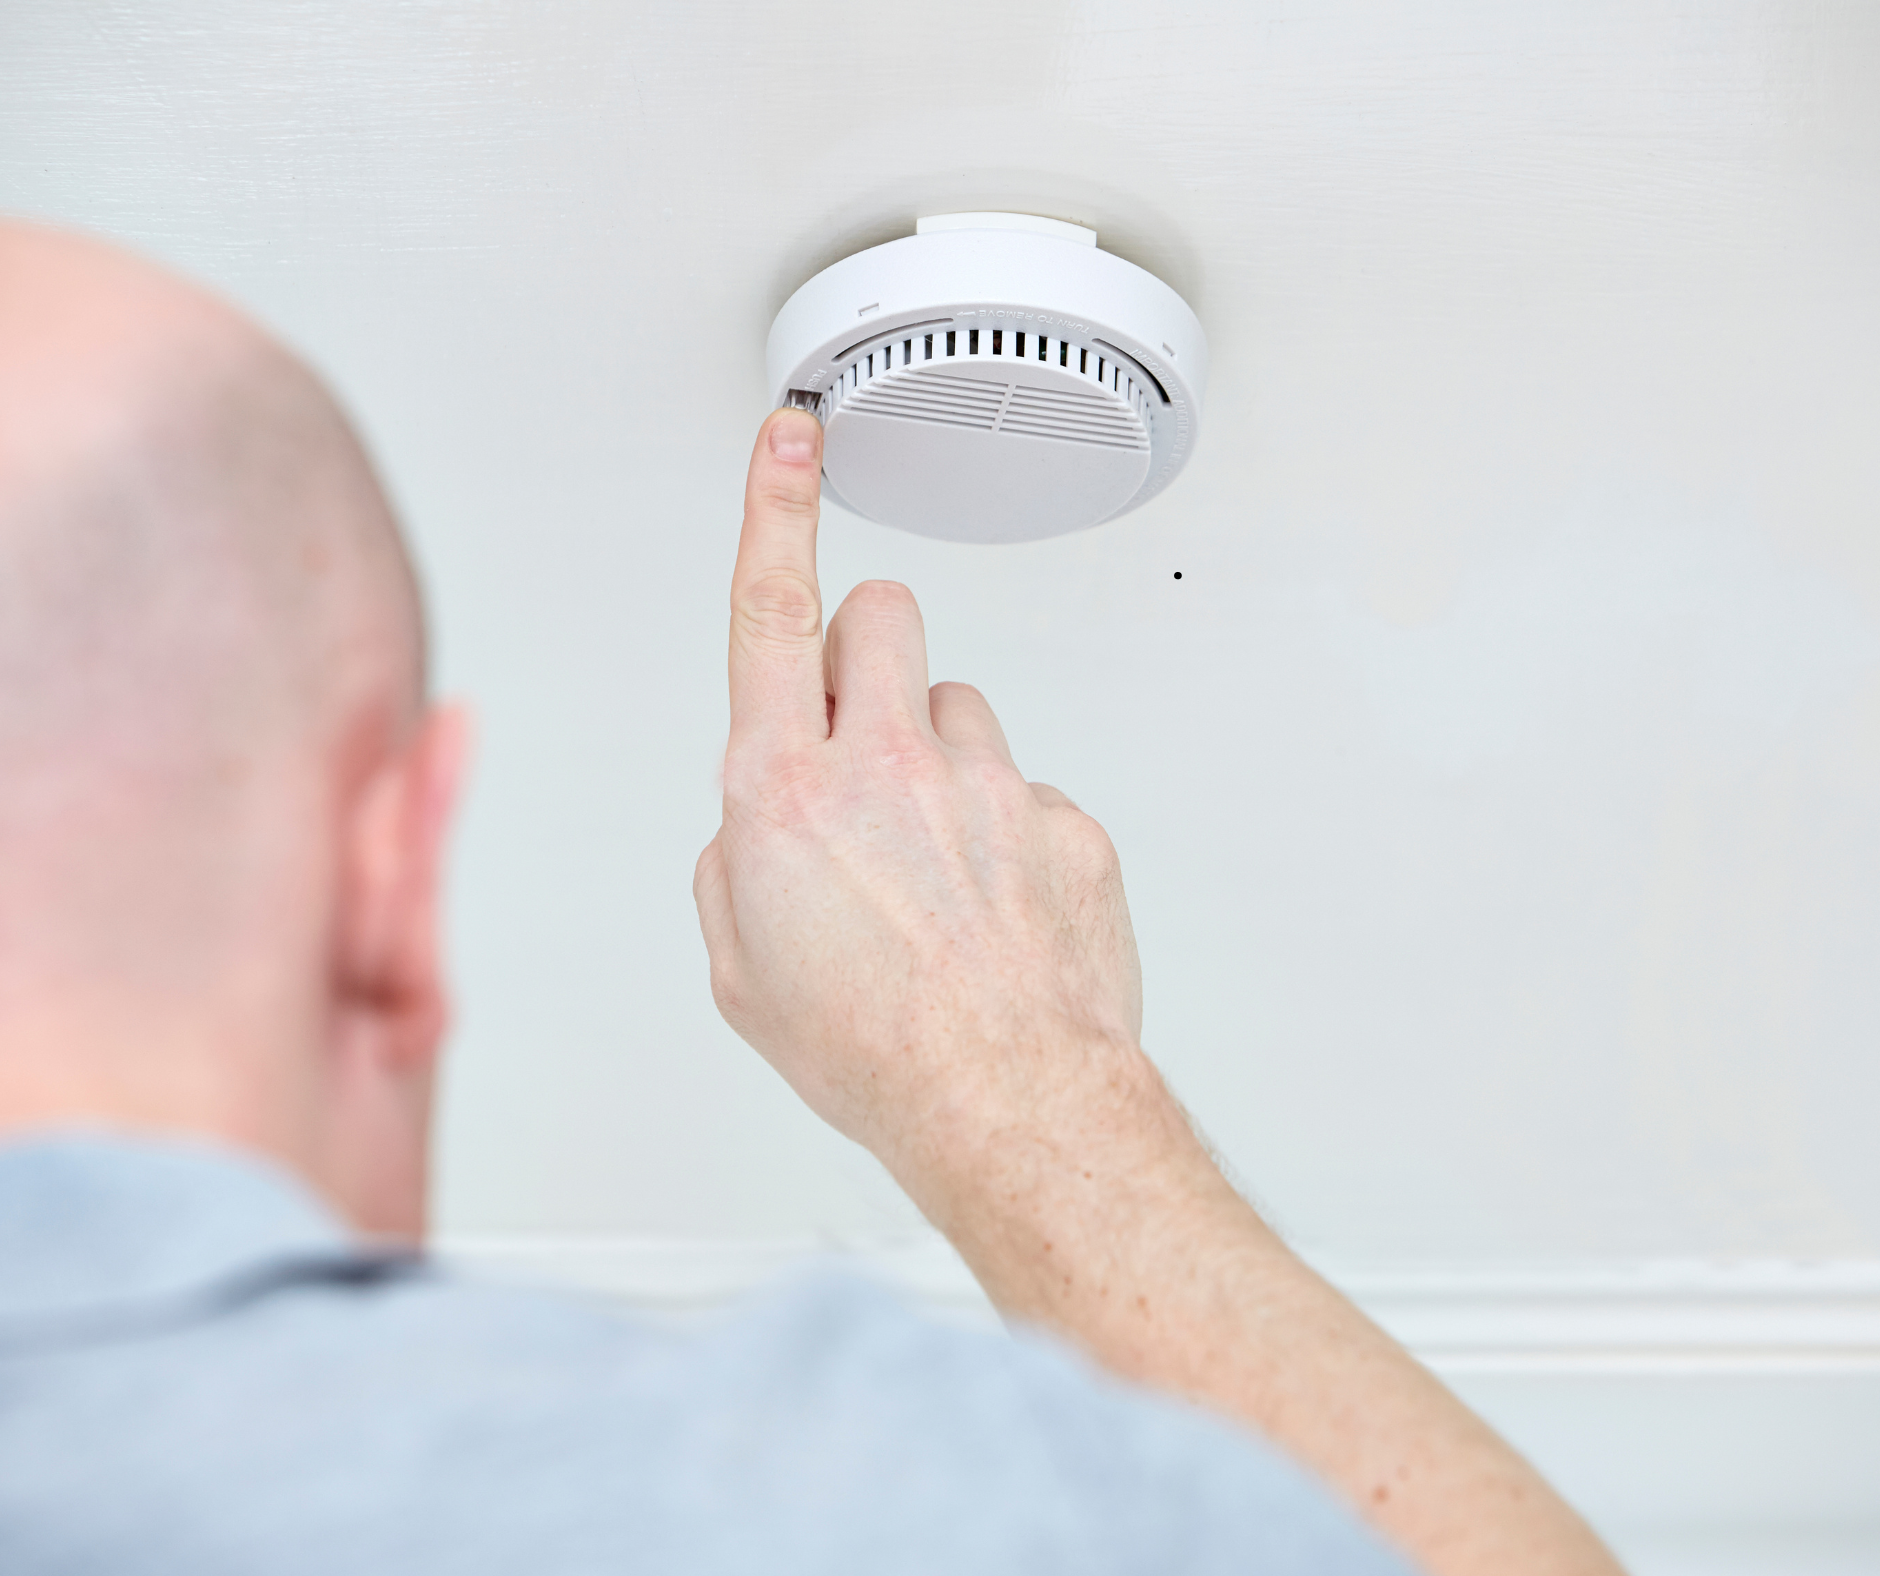
What to do: Press the “Test” button on each unit and hold it for a few seconds.
You should hear a loud, unmistakable beep or screech.
If the sound is weak or non-existent, replace the batteries immediately.
What to look for:
If the unit doesn’t respond at all, even with new batteries, it’s time to replace it.
Check the expiry date (yes, they have one). Most smoke detectors expire after 10 years, and CO detectors usually after 7–10 years. The date is usually printed on the back. The expiry date is from the date of manufacturing, not the date you installed it.
✅ Know where your detectors should be
Smoke detectors should be:
Inside every bedroom
In hallways outside bedrooms
On every level of the house
Near stairways
Ideally, interconnected—so if one goes off, they all do
Positioned no closer than 12” away from a wall if on a ceiling or no closer than 12” to the ceiling if it’s on a wall
Carbon monoxide detectors should be:
On every level that has a fuel-burning appliance (furnace, fireplace, gas stove, etc.)
Near bedrooms—because CO is odourless, and people often don’t realize there’s a problem until it’s too late
NOT in kitchens or bathrooms (steam or heat can cause false readings)
👉 If you’re not sure your detectors are in the right place, this is a great question to ask a licensed electrician or fire safety specialist during your next inspection or reno consultation.
✅ Clean around the detectors
What to do:
Use a can of compressed air or a soft brush attachment on your vacuum to remove dust from around your smoke and CO detectors. Dust buildup can affect performance, especially in older units.
✅ Inspect dryer vent and lint trap
What to do:
Remove the lint trap in your dryer and vacuum beneath it.
Go outside and check the exterior vent (where your dryer exhaust exits the home). Make sure it isn’t clogged with lint or stuck closed.
Why it matters:
Dryer lint is highly flammable, and dryers cause thousands of house fires every year.
If lint builds up inside the duct, it can cause the dryer to overheat or even leak carbon monoxide (especially if it's a gas dryer).
💡 If your clothes are taking longer to dry, it’s probably not your dryer—it’s your vent choking on lint.
✅ Look for flammables near heat sources
What to do:
Check the areas around your furnace, water heater, and baseboard heaters.
Look for boxes, paint cans, plastic bins, seasonal decor, or sports gear that’s crept too close.
Why it matters:
Furnaces and hot water heaters can get hot—and in the worst-case scenario, that cardboard box of holiday lights could become kindling.
💡 If it’s flammable, it shouldn’t be stored within three feet of any heat-producing appliance.
✅ Check your fire extinguisher
What to do:
Make sure the pressure gauge needle is in the green zone.
Check that the pin is still in place, the nozzle is clear, and there’s no visible damage to the body.
Give it a quick shake to prevent the powder inside from settling and hardening.
Where you should have one:
In the kitchen (not under the sink, where you’ll never reach it quickly)
In the garage
Near your furnace/mechanical room
Optional: upstairs hallway or laundry room
💡 Fire extinguishers aren’t just for pros. If you’re comfortable using one, they can stop a small fire before it becomes a big one. But if you’ve never used one before, it’s worth taking 10 minutes to watch a quick how-to video so you’re not reading the instructions mid-emergency.
Have a fire escape plan. Even if it’s just a quick chat with the family once a year—it matters.

4. Mould and Moisture Patrol
What to Do:
✅ Sniff around bathrooms and basements. Musty = bad.
✅ Check behind furniture near exterior walls.
✅ Inspect caulking in tubs and showers.
✅ Look at baseboards for warping or water marks.
What You Might Find:
Black spots on caulk: Mould growth.
Musty smell but no visible mould: Might be behind walls or under flooring.
Condensation on windows: High humidity and poor air circulation.
Warped baseboards: Moisture issue or past leak.
DIY or Pro?
🔧 DIY: Replace caulking, clean surface mould, use a dehumidifier.
☎️ Call a Pro: If there’s mould behind walls, covering large areas, or causing allergy-like symptoms.
🧱 Section 5: Structural & Interior Safety (5–7 minutes)
You might not notice a crack in the drywall right away. Or a door that’s a little harder to close than it used to be. But those “meh, it’s probably fine” details can sometimes signal major structural changes that need to be addressed before they become serious (and seriously expensive).
Think of this section like giving your house a little poke in the ribs. You’re checking to see if anything has shifted, sagged, cracked, or settled in ways that raise a red flag.
✅ Check walls and ceilings for cracks or movement
What to do: Walk each main room and look at the corners, along the ceiling line, and around doors and windows for any cracking in the drywall or plaster.
What to look for:
Hairline cracks along walls or ceilings—especially at seams
Diagonal cracks coming out from door or window corners
Ceiling “shadows” or depressions that weren't there before
💡 A tiny hairline crack is often cosmetic. But a long, jagged, or widening crack? That’s when it’s time to dig a little deeper.
✅ Open and close all interior doors and windows
What to do: Go room to room and open and close every interior door and window.
What to look for:
Sticky doors that used to open easily
Doors that don’t latch or seem slightly off-kilter
Windows that are harder to open or don’t stay open on their own
Why it matters: When doors or windows stop lining up, it could be a result of framing shifting, foundation settling, or moisture swelling the wood. Any of these can cause long-term structural issues if left unaddressed.
💡 Bonus tip: If a door used to shut fine and now suddenly rubs the frame—don’t ignore it. It's not the weather. It’s the structure talking.
✅ Check for signs of foundation movement
What to do: Walk the perimeter of your home’s interior and exterior and look at the base of walls, inside closets, and along baseboards.
What to look for:
Cracks in basement walls, especially if they run horizontally or are wider than 1/8"
Cracks at the corners of door frames or above doors
Uneven or sloping floors—do you notice your furniture leaning?
💡 Use a marble or small ball to check for slope—if it rolls away on its own, your floor’s trying to tell you something.
✅ Look for bulging walls or sagging ceilings
What to do: Stand back and look at your ceilings, especially near bathrooms and laundry rooms (where moisture loves to sneak in).
What to look for:
Bulges or dips in the drywall or plaster
Uneven ceiling texture or waves
Seams pulling apart
These could be signs of moisture from above—often from a small leak that hasn’t yet made its way through the ceiling entirely.
💡 If you push gently on the sag and it moves or feels soft, it’s time to act fast.

🧠 What These Issues Could Mean:
Hairline crack in drywall
→ Normal house settling.
→ ✅ Monitor it. Patch it up if cosmetic.Diagonal crack from window or door corner
→ Could indicate structural movement or shifting frame.
→ ⚠️ Track changes over time. Call a contractor if it widens.Sticky door or window that used to open easily
→ Framing may be shifting or swelling from moisture.
→ 🟡 Check for nearby leaks. Call a pro if multiple doors are affected.Crack in basement wall wider than 1/8”
→ Possible foundation movement.
→ 🔥 Call a foundation or structural specialist.Sagging ceiling near bathroom
→ Moisture from a hidden leak above.
→ ⚠️ Stop using nearby plumbing. Call plumber and drywaller.
🛠️ Pro Tips:
Take pictures of cracks or questionable areas with a ruler in frame. Check once a month—if it grows, you’ll know.
Watch for seasonal shifting—some minor movement is normal with temperature and humidity swings, but it should return to baseline.
Foundation cracks that are horizontal, stair-stepped, or leaking water? That’s not cosmetic. That’s call-a-pro-right-now territory.
Your house is always moving, but it shouldn’t be wobbling. If something feels “off,” don’t gaslight yourself. Your instincts are probably right.
🚨 Section 6: Trip, Slip & Fall Patrol
You might not think of a loose stair railing as a “home disaster,” but one misstep can send you flying faster than a squirrel on a bird feeder. Unlike some of the other dangers we’ve talked about, falls happen fast and hit hard, especially for kids, seniors, and distracted adults with arms full of laundry baskets.
This check is all about catching the little things that could send someone tumbling—before they do.
✅ Shake your stair railings and grab bars
What to do: Put a hand on every railing in the house—indoor and outdoor—and give it a good shake.
What to look for:
Any movement or “give” at the wall or base.
Squeaky sounds, wobbly fasteners, or mounting hardware that looks stripped.
Why it matters: A loose railing might feel like a minor issue—until someone actually needs it to break their fall. Then it becomes a lawsuit waiting to happen (or at the very least, a trip to the ER).
💡 If the rail pulls away from the wall or wiggles at the base, stop using it and repair it as soon as possible.
✅ Scan stairs and walkways for hazards
What to do: Walk up and down every set of stairs in your home—and slowly. Pay attention to:
Uneven stair treads
Slippery surfaces (especially in socks)
Loose or curling carpet edges
Items stored on stairs (we see you, laundry piles)
Also check:
Hallways and frequently walked paths for rugs that shift or curl up, cords running across walkways, and uneven transitions between flooring materials.
💡 Pro tip: Rubber grippers under rugs cost just a few bucks—and are much cheaper than a twisted ankle or fractured hip.
✅ Look for loose or broken tiles and floorboards
What to do: Slowly walk through high-traffic areas and gently press down on floorboards, tiles, or laminate flooring.
What to look for:
Movement or creaking beneath your feet
Cracked or broken tiles with sharp edges
Floor transitions that have lifted or shifted
💡 Tripping on a loose floorboard won’t just hurt your toe—it could be a sign of water damage underneath. Definitely worth investigating.
✅ Inspect your lighting in stairwells and hallways
What to do: Turn on all stairway and hallway lights, especially at night or with curtains drawn.
What to look for:
Burnt-out bulbs that reduce visibility
Poor placement that leaves dark patches on stairs
Flickering bulbs that feel like a nightclub (but not in a good way)
💡 Consider swapping in LED daylight bulbs in these areas for extra brightness and longer life. And if your stair lights aren't on a three-way switch, you may want to upgrade—being able to turn them on from both ends is a safety win.
🧠 What These Issues Could Mean:
Loose railing or grab bar
→ Anchors or screws may be pulling out of drywall or framing.
→ ⚠️ Tighten or replace hardware. Call a pro if it’s attached to a tile wall or concrete.Stair with loose carpet or uneven tread
→ Risk of trips and falls. May indicate subfloor movement or wear.
→ 🟡 Can be a DIY fix with carpet tape or staples. If persistent, call a flooring expert.Rugs sliding on hard floors
→ High fall risk, especially for seniors or kids running barefoot.
→ ✅ Add non-slip rug pads or use double-sided tape to secure.Loose floorboard or cracked tile
→ Could indicate water damage or shifting subfloor.
→ ⚠️ DIY if cosmetic. Call a pro if movement is significant or covers a large area.Dim or flickering stairway lighting
→ Poor visibility = high trip risk. May also indicate faulty wiring.
→ ✅ Try bulb replacement. If still dim or flickering, call an electrician.
🛠️ Pro Tips:
Add motion-sensing night lights in hallways, especially for night owls and early risers.
Never store items on stairs—even “just for a second.” That’s how ankles and necks get broken.
If your handrail ends early or is too short, extend it. It should run the full length of the stairs for safety.
Check exterior steps too, especially in winter. Uneven patio stones or icy wooden stairs are lawsuits waiting to happen.
Pro Tips to Keep This Manageable
Pick a consistent day: First Sunday of every month.
Print this list or keep it on your fridge.
Keep a “Home Health” notebook with photos and notes.
Don’t skip it just because everything looks fine. Some issues are quiet until they’re catastrophic.
Reward yourself after: You just adulted like a pro. Coffee, cookie, or cat snuggle—your pick.
Want to Go the Extra Mile?
If you're feeling ambitious, here are bonus checks you can rotate through:
Test your sump pump (pour water into pit, check it turns on)
Open attic hatch and check for damp insulation or pests
Inspect garage door sensors
Vacuum refrigerator coils
Final Thoughts: Your House Called—It’s Thankful You Care
Doing a monthly home safety check isn’t about paranoia. It’s about prevention. It’s about walking into your kitchen and not stepping in a puddle. It’s about heading into winter without worrying that your furnace vent is blocked. It’s about saving thousands of dollars and dozens of grey hairs—and knowing you’re doing everything you can to keep your family safe and your home sound while protecting your investment.
And if you find something during your check that makes you raise an eyebrow (or a white flag), we’re here to help.
Love the idea of checking things off as you go? We’ve got you covered. Click here to grab the printable version of this checklist. Your future self will thank you.

Keeping your home in top shape doesn’t stop here. If you found this checklist helpful, you’ll love these other practical reads that tackle everything from hidden mould to choosing the right licensed pros.
Why Hiring Licensed Tradespeople Is Important in Home Renovations
Maintaining Your Home’s Plumbing: Tips for Preventing Leaks
How to Check and Maintain Your Home’s Electrical System
5 Surprising Causes of Bathroom Mold and How to Prevent Them
How to Drain Your Hot Water Tank and Why You Should
Ready to Tackle That To-Do List Before It Becomes a Repair Bill?
You’ve just taken a smart first step by learning how to protect your home with a simple monthly safety check. But if that checklist turned into a laundry list of things you’ve been meaning to fix—don’t stress. That’s exactly what we’re here for.
At Multi-Trade Building Services, we’ve spent over 35 years helping homeowners catch small problems before they become expensive emergencies. Whether it’s a leaking valve, a suspicious outlet, or a crack in your ceiling that wasn’t there last month—we’ll fix it with care, transparency, and zero runaround.
📞 Call us at 905-999-8524 or click the button below to get in touch.
Let’s keep your home safe, functional, and worry-free—just like it should be.